Showing posts with label stem. Show all posts

Thursday, February 15, 2018

Mad Science: The Science of Sound

Today in Mad Science, we learned all about what makes sound happen. I remembered vaguely that there was a Magic School Bus episode about sound, so I took to the trusty Internet to locate it and show a clip that would explain vibration and sound waves better than I am able to. At the beginning of the program, I showed two videos.


The first video was the Magic School Bus clip I was thinking of. It does a great job explaining how vibration makes sound, and the basics of sound waves. The second video is from The Dr. Binocs Show, one I was not previously familiar with. I like this one because it also goes over vibration and sound waves, but then furthers the discussion by talking about matter and the absence of sound in the vacuum of space.

For our experiment today, we did a mini DIY musical instruments lab. First we made a harmonica out of tongue depressors and rubber bands. I did this as a step-by-step workshop, not telling the next step until everyone had completed the current one. This way, no one got to the end and started playing their harmonica too early.


While it was difficult to teach while the kids were excited about making noise, I opened up a discussion about the construction of our harmonicas. What did the kids think could be done differently to produce a louder sound? A different pitch? What would happen if we removed the paper from inside?

They decided that the paper creates space between the sticks, which is necessary to create a vibration on the rubber band. According to the videos we watched, vibration is required for sound to happen. A couple of them constructed a second harmonica with no paper, and their hypothesis was proved correct!

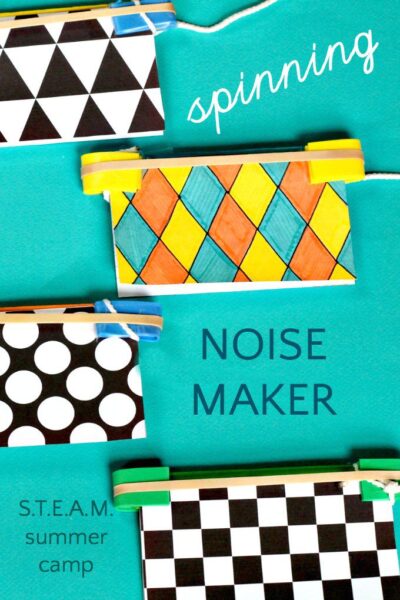
Our second experiment was a buzzing noise maker made with index cards, string, pencil-top erasers, and rubber bands. There is a great entry with a video on What We Do All Day that explains exactly how to make it. I did this project step-by-step as well, and didn't tell the kids that the aim was to spin it and make it buzz until everyone's was complete.

Science experiment for kids. How to make a spinning noise maker.

Like we did with the harmonica, I took a few minutes to talk about why the construction of this instrument works the way it does. We quickly identified the source of vibration, and also like the harmonica, realized that removing the index card stops the vibration, and therefore, the sound.

At the end of the program, we watched the two videos again for the handful of late-comers who missed them at the beginning. The kiddos were delighted to bring their buzzy new toys home, and I officially feel like a science teacher.

Friday, February 2, 2018

Bird Feeder Challenge

February is National Bird Feeding Month! This was a very cool program conceived and planned by Sara, but carried out by me because she was out sick. I actually debated posting it on my blog because this program was not technically mine, but I love the idea and the pictures of all the kids with their finished bird feeders. I figure as long as I don't take credit for the idea, we're good to go.

The Bird Feeder Challenge was a program for school-age kiddos, and had three basic parts. First, we talked about all the aspects that make up a good bird feeder, and why. Second, the kids had some time to make their own bird feeders out of found objects, Crisco (in lieu of peanut butter in case of allergies), and bird seed. Third, each child got a chance to stand up in front of the group and tell us about their bird feeder.

First, we made a list of everything a bird feeder needs to be successful. Here is what they came up with:


I left this list up so they could refer back as they constructed their own feeders. 

The building process:


After the building time was over, some of the kids were reluctant to tell everyone else about their creation. A couple of them preferred to sit instead of stand, but eventually all twelve kiddos told us where the bird(s) stand, how they get their food, and what is special about their creation. 

In addition to being lots of messy fun, there was an important educational element to this program. The actual construction of the bird feeders encourages STEAM concepts such as engineering and architecture. 

If I were to do this program again, the only thing I'd change is taking a little more time at the beginning to talk about bird feeder construction before launching into the list-making. Luckily this group all had a pretty good idea of what a bird feeder is, but not all kids do. This was actually a suggestion made by a mom. I learn something new with every program I present!

Here are some of the kids with their finished bird feeders (posted with parent permission).


Tuesday, January 2, 2018

I'm a Little Bit Famous Now

Just kidding, I am in no way famous. I did, however, get to be on the local news as a library representative earlier this morning.

The local organization Grand Canyon State Model Railroaders have been at our library with a giant HO Scale model train exhibit since Wednesday, and they will be here until the end of the week. The exhibit is pretty amazing. It takes up our entire program room, which has a capacity of over 300 people. All the models are handmade by members of the group, and each is based on a different town with an interesting history. The train cars themselves are one 68th to scale of a real train, meaning it would take 68 of the models to make up one life size train car. The speed they travel around the track is also to scale, which is an interesting tidbit I learned while preparing for my interview.

These are a couple pictures I got from their Facebook page. Click the link above to visit their page and see some cool videos of the trains in action!

Image may contain: outdoor

No automatic alt text available.

In preparation for my interview, I worked with our marketing team to come up with some reasons we wanted to have trains at the library.
  • Multi-generational programming: Trains are nostalgic for a lot of people, and interesting to people of all ages. This exhibit is something all members of the family can enjoy and discuss.
  • STEM: Science, technology, engineering, and math. 
    • There are quantifiable physics involved with the way trains move on the tracks.
    • Evolution of the technology of trains over the decades.
    • Math of figuring out accurate scale of models to life size trains.
  • History: Each handmade model is based on a real historical town.
  • Community engagement: Getting people into the library who wouldn't usually come, or who have never been before. 
  • The library supports engagement hobbies such as making scale models as part of lifelong learning.
Of course, I didn't actually get to use any of these great talking points in my interviews. They just wanted the bare bones from me: We are excited to have the trains here, everything is free, and it's running all week until Saturday. 

The first video does not include me, but has some great information from one of the Grand Canyon Model Railroaders about the exhibit.


Here are my two big exciting interviews, that are definitely not filmed with iPhone cameras straight off the TV (Just kidding, they are):


(1 more video to come)

Later in the day, Channel 10 also came and interviewed a different member of the group.


Overall, facilitating media visits and being interviewed for the news was a really cool experience. I didn't stumble over my words nearly as much as I thought I would, even though it was 5:00 in the morning and I had had roughly an hour to memorize my talking points. I felt really excited to be representing the library, and the city, on the TV news. Sometimes I feel like a door-to-door salesman or religious zealot trying to spread the good word of the public library, but I'm so psyched every time I get to tell more people about it! I know the news spots were really more about the train exhibits than the library, but even so, a bunch of people will probably visit the library who might have never been in before. That's what library programming is all about!

In closing, here is a selfie I took with the camera guy, Brett, and the reporter, John.

Saturday, December 16, 2017

Gingerbread Geometry

Another awesome winter program!

Also, another program that I did not technically plan, but did help out with the staffing. Sara planned this one with another staff member who got sick unexpectedly, so I jumped in to help pass out materials and answer questions. It ended up being a total blast; we took the tradition of making gingerbread houses and added a mathematical twist!

Materials:
  • Graham crackers (6 per child)
  • Icing (Can be store bought, or made using powdered sugar and water)
  • Assortment of candy for decorating
  • Plastic table covering
  • Plastic knives (one per child)
  • Ruler (one per child)
  • Disposable trays (one per child)
Using graham crackers instead of gingerbread was key for this program, for a couple of reasons. One, easier to find and cheaper to purchase. Two, they are perfectly rectangular.

Step one: Give each child six graham crackers.
Step two: Cut one inch off of two of your graham crackers.
Step three: Using icing, form a rectangle with the graham crackers to be the walls of your house.

At this point, there was a discussion about area. The audience was slightly younger than I think Sara was anticipating. She was planning to have tweens who would understand math concepts, but we ended up with a couple of tweens and the rest under five years old. So she skipped having them write down the wall measurements and then multiplying those measurements to find the area of the house. She also briefly explained what the volume of a shape is, but skipped the written part of figuring out the volume of our houses. In case you want to do this with an older age group, here is that information (the inch measurements are not exact, just examples. As a group you can measure your crackers and figure out the exact measurements).

Area: The side of a surface
Area = width x height; A=wh

Long sides of the graham crackers are 5 inches (length). Short sides are 4 inches (width). The area of the gingerbread houses are length times width, or 5x4=20. The area of your house is 20 inches.


Volume: The measure of the amount of space inside a solid figue
Volume = length x width x height; V=lwh

Long sides of the graham crackers are 5 inches (length). Short sides are 4 inches (width). When standing up, the crackers are 2 inches tall (height). The volume of the gingerbread houses are 5x4x2=40. 


Instead of doing the math with pencils and paper, we moved on to the next part of the building.

Step four: Use your remaining two graham crackers to add a triangular or flat roof
Step five: Decorate with icing and candy!

While we had a few families attempt the triangular roof, the icing dried too slowly and most of the kids opted for the easier flat roof.

Before we started, I made 12 individual cups with some of each kind of candy: Twizzlers, Red Hots, those buttery dinner mints, individually wrapped peppermints, and gum drops. This way there was no fighting over candy because each participant had the exact same thing in their cup, and everyone had the same amount of icing (a powdered sugar/water mixture in baggies for easy piping) to decorate with. Check out their amazing creations!


The roof is a monster face eating candy!


Monday, October 30, 2017

Pumpkin Mosaic Art

Since it's October, I hosted a drop-in craft for all ages with the theme of pumpkins. Living in Arizona, it's sometimes hard to remember which season it is by looking outside, because it stays in the 90's well into November and then suddenly drops to the mid-50's until Spring. So, we overcompensate for our lack of weather with extra decorations.


This is the example I made of a mosaic pumpkin. This is a fun art project that you can easily tailor to any age group, which was lucky for me because I had a family with a baby and a preschooler, a set of three pre-teen siblings, and lots in between.

Making a pumpkin mosaic includes four basic steps:
1. Paint a piece of white paper your desired pumpkin color (fun to mix paints and create a custom shade). Wait for it to dry. We had Halloween and Autumn coloring sheets to work on while we waited.
2. Cut your custom painted paper into strips, then cut the strips into triangles, rectangles, and squares.
3. Fit your new shapes onto a construction paper pumpkin and glue them down.
4. Decorate with googly eyes and a Jack-o-Lantern smile!

This project is great for motor skill development because of the painting and cutting with scissors, and also helpful in developing spacial awareness by fitting the pieces together on the pumpkin.

I thought I got some pictures of our awesome final products, but I can't find them now! So instead, here is a .gif of a librarian (and/or model) wearing a dress I wish I owned in front of a photo backdrop I wish I owned, and my promise to be better at taking pictures of adorable children's art in the future.

Thursday, September 21, 2017

Make a Sensory Jar

I got a completely unexpected age group for this program. Scheduling on a weekday morning, I guess I should have realized that the majority of my participants would be under 5 with parents, but I didn't think they would be mostly under three! Even though the project ended up needing more parent help than originally anticipated, we had a lot of fun and the kids left with gorgeous glitter jars.

The point of this workshop was to learn how to make a sensory jar. Even if you don't recognize this craft by name, I'm sure you've seen them if you are even a little bit active on Pinterest, Instagram, Facebook, or if you just plain don't live under a rock. They're also called glitter jars, calm down jars, and about a hundred other names. You fill them up with water, glitter glue, and small objects like sequins or buttons, and then shake them up and watch (hopefully mesmerized) as all the stuff inside settles back down. I wanted to hold this workshop because they are gorgeous but can be difficult to make, and I know they would come in handy with a lot of parents and caregivers.

Image result for sensory glitter jar

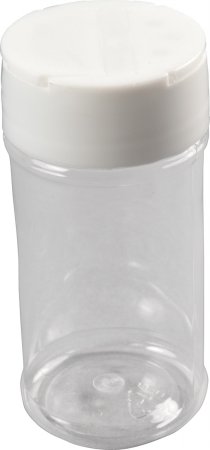
Because I work at the public library and we don't have a budget for full size Voss water bottles and enough stuff to fill them, I ordered twelve 3 ounce plastic spice jars and limited registration to twelve families. The plastic jars were three or four inches tall, and ended up being the perfect size for the little ones to grasp.

Image result for amazon plastic spice jar 3 oz

I laid out glitter glue, loose glitter, sequins, buttons, and heated up a hot glue gun (kept far away from tiny fingers). I also had a kettle of warm water on standby, because glitter glue melts better in warm water. However, the water started off too hot and some of the jars got a little disfigured. Just a little; no leaking, and it was a learning experience.

In addition to making the tiny jars, I sent everyone home with directions that I downloaded from Good to Know, a UK-based crafting blog. I also printed out a simple word document detailing a few of the many uses for a sensory jar at home:

Calm down
Shake it up to get some anger out. Then sit quietly and watch it swirl until all the glitter, water, and objects are still. As the bottle clears, so does the mind. Great for all ages of children and adults.

Time-out timer
Shake it up, and sit in time-out until the jar is completely settled. Great for preschoolers.

Sensory exercises
Make several jars with different objects inside, or varying color schemes. Encourage children to play with them as a form of sensory play. Safe and non-messy, this kind of free form exercise allows children to make sense of how they experience the world through their senses of sight, touch, movement, and balance. Great for children with sensory issues such as an aversion to getting their hands dirty.

Experiencing small objects
Very small children do not often get to use tiny toys because of choking hazards. These jars give them a chance to play with tiny toys safely. Children under 3 can play with their jar and experience tiny toys such as beads, buttons, and loose glitter in a way that is neither harmful nor messy!

Home science lesson

Why do some of the items float and others sink to the bottom? Do the items and glitter in the jar move more quickly in a jar filled with mostly water, or mostly glue? Make a hypothesis. Test it by making several jars with different objects and liquid consistencies in each one. Read science books or websites to find out about density. Come to a scientific conclusion based on your research. Investigate the scientific process while creatively exploring arts and crafts. Excellent exposure to the scientific method for all ages!

Explore all the different ways you can make a sensory jar by searching the internet with phrases such as “glitter jar,” “sensory jar,” “calm down jar,” “discovery bottle,” or “sensory bottle.” There are hundreds of resources out there, and thousands of ways to play and learn!


Of the twelve families who signed up to attend this program, only six showed up. However, all the families had two children with them, so instead of one jar per family, we were able to make one jar per child! 

Some crafters say Voss brand water bottles (glass or plastic) are best for making sensory jars, but others swear by Mason jars or plain old water bottles. I used a glass Voss bottle for my large example, because we happened to have an unclaimed one in the lost and found. I put glitter glue, loose glitter, and buttons inside. The objects all settle at different times which is really satisfying. 

Here is a look at my large sensory jar that I made as an example of what they could make at home, as well as one that one of the kids made during the workshop. The small one contains glitter glue, loose glitter, and sequins. 

Small jar, shaken up

Large jar, settled

Large jar, shaken up