Showing posts with label homeschool science. Show all posts

Thursday, February 15, 2018

Mad Science: The Science of Sound

Today in Mad Science, we learned all about what makes sound happen. I remembered vaguely that there was a Magic School Bus episode about sound, so I took to the trusty Internet to locate it and show a clip that would explain vibration and sound waves better than I am able to. At the beginning of the program, I showed two videos.


The first video was the Magic School Bus clip I was thinking of. It does a great job explaining how vibration makes sound, and the basics of sound waves. The second video is from The Dr. Binocs Show, one I was not previously familiar with. I like this one because it also goes over vibration and sound waves, but then furthers the discussion by talking about matter and the absence of sound in the vacuum of space.

For our experiment today, we did a mini DIY musical instruments lab. First we made a harmonica out of tongue depressors and rubber bands. I did this as a step-by-step workshop, not telling the next step until everyone had completed the current one. This way, no one got to the end and started playing their harmonica too early.


While it was difficult to teach while the kids were excited about making noise, I opened up a discussion about the construction of our harmonicas. What did the kids think could be done differently to produce a louder sound? A different pitch? What would happen if we removed the paper from inside?

They decided that the paper creates space between the sticks, which is necessary to create a vibration on the rubber band. According to the videos we watched, vibration is required for sound to happen. A couple of them constructed a second harmonica with no paper, and their hypothesis was proved correct!

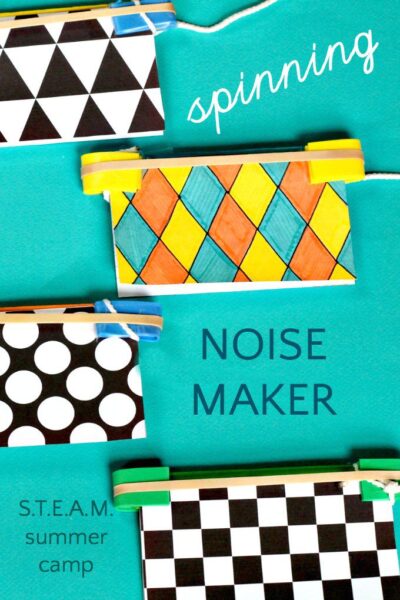
Our second experiment was a buzzing noise maker made with index cards, string, pencil-top erasers, and rubber bands. There is a great entry with a video on What We Do All Day that explains exactly how to make it. I did this project step-by-step as well, and didn't tell the kids that the aim was to spin it and make it buzz until everyone's was complete.

Science experiment for kids. How to make a spinning noise maker.

Like we did with the harmonica, I took a few minutes to talk about why the construction of this instrument works the way it does. We quickly identified the source of vibration, and also like the harmonica, realized that removing the index card stops the vibration, and therefore, the sound.

At the end of the program, we watched the two videos again for the handful of late-comers who missed them at the beginning. The kiddos were delighted to bring their buzzy new toys home, and I officially feel like a science teacher.

Thursday, March 30, 2017

Homeschool Corner: Fossils and Volcanoes

The Maricopa County Fair is just around the corner, and Madi is hard at work (kind of. most days.) on her 4H Cloverbuds project. 4H was something we sort of fall into by accident, since neither Auntie or I know have ever really been a part of it, and we aren't exactly in a rural/farming area--it wasn't even on my radar until I saw that our local zoo sponsors an urban 4H group. And boy, do we love our zoo (But thats a post for another time).

So Madi turned 5. We signed up. We went to the first meeting.
And she heard there would be worms.
If theres one thing this girl loves, it's worms.
Serious, it was love at first sight (another post for another time!)

So, we stayed. Which brings us to the week before the County Fair.

Her project is about fossils, specifically, fossils we have found. She has loved all things earth science from before she could talk (rock and dinosaur were among some of her first signs), and every year we go to the Flagg Gem and Mineral Show at the local community college. She saves her Christmas money to add new specimens to her collection, which currently spans 6 egg cartons, two coffee tins, and a miscellaneous bag of individually wrapped rocks. Every time we go hiking with Grandpa, the backpack comes back suspiciously heavy and the tins get a little more full.

We had a lot to sort through.

After much debate of the pros and cons, we settled on picking only from her prized egg carton: the fossil carton. However, it still has a fairly dizzying array of different types of fossils, including a pyritized ammonite from a beach in Britain that a friend sent over, a trilobite encased in sandstone,  lots and lots of brachiopods/bivalves from all over the Oregon coast, sponges, coral and shark teeth from Northern Arizona, and crinoids from Utah.
So we added new criteria: only fossils she and I have personally found.

And eventually we narrowed it down to three.

But then we read the fine print on the entry form linked in our registration e-mail. All entries require an informational poster or placard, in a specific size (which of course we didn't have, so clearly time for a trip to Target). 

And so THIS conversation began:
Me: "If this is something you want to enter in the Fair, you have to write information about it according to the rules."
Her: "I don't want to. I just want to enter the rocks."
Me: "I know you were just anticipating entering the rocks, but the director sent me an email and all the entries have to be labeled, so people who come to visit know what they're looking at."
Her: "I'll stand by it and explain it, then."
Me: "But the Fair is every day for a week, for 12 hours a day--later than your bedtime. Neither of us can commit to doing that."
Her: "Fine, then you write it."

Ah, the old, "You do it, then."

After more discussion--including why I wouldn't do it all (its not my entry, she's capable of doing it) and what I would do (I can help research what to write, help check spelling, even draw out a grid so there's a guide to make all the letters the same size)--we started what she has dubbed "THE NIGHTMARE," i.e., the poster.


Researching what to write was day 1. We visited multiple websites, read sections of geology and paleontology books, watched two documentaries, and settled on using the information a family favorite, The Encyclopedia of Dinosaurs and Prehistoric Life, as it was the most up to date and reliable information. Being able to think critically about information and sources is extremely important. I don't want to cram Madi full of facts, which will only serve you so far, as much as I would like to set up a solid foundation of critical thinking that allows her to approach problems and work her way through them later on. So this was a fun way to talk our way through the Critical Thinking cheatsheet. Some of the sources were outdated, like Grandpa's geology textbook from the 1970s. Others had a decidedly religious bias, or were hosted by non-professional organizations

Hey there, Auntie Librarian inserting a bit of commentary. While Anna was writing this post she told me about the outdated or incorrect sources, and I wanted to share what we do in the library with such things: WEED THE CRUD OUTA THEM. If you're not familiar with the concept of weeding, it is basically taking materials off the shelves and donating them to book sales, or throwing them out. There are several reasons why this gets done, including but not limited to physical condition of the item and how many times it's been checked out. Not to be mean to the books; I love all books no matter how dilapidated they are. But it's a library's mission to not only provide information, but make sure they're providing the right information. Every weeding project makes me vaguely sad because sometimes the books we're removing are in pristine condition and I'd love to adopt them and give them a good home. But, if that beautiful looking book was published in 1985 and has only been checked out four times since then, there must be a reason. If that beautiful book is another copy of Grandpa's 1970's geology book, I'd rather donate it to a used book sale and hope some nice geologist/historian finds it useful to their research. I think Anna's point was that you should be discerning about your sources when doing research, which is absolutely true. I wanted to add that librarians also do their best to be discerning about what is on their shelves in the first place, to aid you in this process. Moving on...

Day 2 was the heavy writing day. Writing, for her, is a painstaking process. The grid helps--using a t-square we draw out a 1 inch grid all over the board, so we can then move a little window cutout one square at a time to focus on getting all the letters the same size and the right shape. Though it isn't perfect, it narrows down the visual distractions and helps mitigate a lot of her frustration when things don't turn out as well as she hoped. 

I like working with her to figure out what tricks and tips help her organize her space and her mind to be optimally successful. How much support is required clearly will vary from project to project and task to task, but what I won't do--absolutely refuse to do!--is do the work for her. 
There's many reasons for that (and because I'm mean, while fairly often suggested, is not one of them).

Ownership of a project leads to pride in her work, and lets her share the joy of what she's doing, since her projects are generally proposed and developed by her. I get to see what she's thinking, how she's thinking, what she's excited about--and thats fun! Also, the process is way more important than the product. That's where the learning happens! So much has been written about this that pretty much anything I say will be a boring rehash, but it's worth reiterating. Being involved is my main goal, and I do that by asking questions, making sure she has the right materials and resources, and helping model/plan time management, as well as providing encouragement when the going gets rough. I usually end up learning in the process (I had no idea that a fossil had to be at least 10,000 years old to count as a fossil. Now I do).

Which brings me to the discussion Auntie and I had staring at the (mostly finished) poster on day 3. Day 3 was going to be drawing what the fossils looked like, but Jeselyn mentioned that when she was a kid, her mom used to do her school projects, particularly the science ones. 

And that set me off on a bit of a rant, because anyone who went to public school knew "That Kid," the one who's parents provided them with picture perfect projects. Many of us were those kids.

"Well," I retorted, "The great thing about homeschooling is when she goes to make a baking soda volcano, nothing is stopping me and you from doing it, too!"

"OH MY. CAN WE DRAW VOLCANOES???"

And so, laughingly, we did that instead.


All of us. 


Including the baby.


And you know what? We all got to feel proud of our efforts!

From left: Mom's, Auntie's (with help from Muffin), Madi's.

Monday, March 13, 2017

Homeschool Corner: Ladybug Life Cycle

A few weeks ago, Maddog (Madi) noticed our patch of cilantro was starting to get a few aphids on it. We talked about what they were doing there: passively drinking sap from the phloem vessels in the leaf cells (a pretty freaky process in which the aphids puncture the thin phloem cell walls and the sap, which is under high pressure, comes gushing out and is forced into the aphids' food canal. Ick). We also discussed how that can hurt the plant by draining it of water and its sugary energy source, and also opening the plant up to diseases. After a quick google search, we learned that aphids can reproduce--very rapidly--by asexual means, pumping out oodles of clones. Live clones. Which, for the record, makes them viviparous (a term we learned from the really cute Ruth Heller book, Animals Born Alive and Well.)

Anyway, we agreed that the aphid invasion was probably the closest thing to aliens we were ever going to witness up close, which is cool, but also that we should probably get rid of them.

I gave her three options: 
1. Rinse them off with soap and water
2. Spray them with pesticides
3. Wait and see if beneficial insects would move in

She wanted to wait.

So we waited.

And waited.


Annnnnnd waited.

While we waited, we read Eric Carle's classic book The Grouchy Ladybug, about an arrogant ladybug who picks fights with animals of increasing size before deciding that maybe he should just share his aphids after all.

Two days later, we saw our first ladybug.


Then a week and a half after that. . . eggs and larvae and ladybugs, oh my!


We spent an afternoon looking for and photographing all the stages of the ladybug's lifecycle, from egg, to increasingly large larvae, to pupae, to adult. We managed to find everything but a pupa (and in the process, got to watch a larva shed its skin "Just like a snake!" and even see two adult ladybugs making some new ladybug babies.)

Eggs
Larva
Shed larval exoskeleton
Mating adults

That offered us the chance to join in a rousing chorus of the ladybug lifecycle song from Capri+3 that's sung to the tune of The Wheels On The Bus:

Ladybug Life Cycle Song

The ladybug starts out as an egg
As an egg
As an egg
The ladybug starts out as an egg clinging to a leaf.

The egg hatches into a larva
Larva
Larva
The egg hatches into a larva
That sheds skin many times

The larva becomes a pupa
Pupa
Pupa
The larva becomes a pupa
That attaches to a leaf.

Inside the pupa a ladybug is formed
Ladybug is formed
Ladybug is formed
Inside the pupa a ladybug is formed
Until it’s ready to crawl out.


We finally rounded up little brother from the sandbox and headed inside. Maddog found her favorite First Discovery book and we curled up to read Ladybugs and Other Insects, which came from Costco about twenty years ago and was mine as a kid. It's still a great book, though, with transparent pages that let you flip from egg to larva, or show the two pairs of wings that ladybugs have (the hard red outer wings, followed by the transparent inner wings that allow the ladybug to fly). 


And that was more or less the end of our ladybug saga. A few days later, they popped up again as the theme of the daily writing prompt. Here I wrote out the numerals and words for one through five, then drew in ladybugs with a number of spots. She had to count the spots, find the numeral, then write the corresponding word. She then drew her own ladybug and wrote how many spots it had (ten).


The daily prompt is an easy, no-stress way to get writing practice each day, since she recently decided the wanted to work on improving her handwriting. Each morning (or afternoon if Mom isn't on top of her game), we come up with a sentence to copy or a prompt to answer, and put it up on the chalkboard wall in the kitchen. Then during the day while I'm cooking or cleaning, she can come in and work on her writing safely out of her brother's helpful reach, and we can talk about the words and letters and sounds while she writes and illustrates. Sometimes we do the dinner menu, other times we do letter matching or word recognition (I write out sight words all over the board, she writes them in a list in the order I call them out). It lets her have some control over what she's learning, so she's engaged in what she's doing (while still enforcing the basics) and often open-ended enough that it's fuel for conversations for the rest of the day!

UPDATE March 15: We found pupae today! Dozens of them, all at once. We had noticed yesterday that many of the larvae were slowing down and beginning to hang by their butts from the leaves, similar to a caterpillar when it is about to form a chrysalis, so we deduced from our caterpillar watching experience that pupae weren't far behind.

Sure enough, as of this morning, we have about 30 pupae, some which we watched pupate in a jar on the kitchen counter. The pupa shakes itself like you would shake a glowstick to distribute the chemicals that help it dissolve its body so it can reform in its little case as a beetle. Watching them turn from black to opaque to bright yellow as the chemicals distribute, and from there darkening to orange, then red, and developing spots, is an amazing process! It can take anywhere from 3 days to 2 weeks for a ladybug to merge, according to google, and the time it takes is dependent on the ambient temperature (with warmer weather resulting in a faster pupation).

I bet within another day or two we will have new adults to release into the garden!